In the previous post, we created 360 tours for the Heritage Trust for the North West (HTNW), to help present their sites to global visitors, or people who may be isolating through Covid.
The final part of this work was to produce 360 video flights to give context – and some WOW factor – in addition to that provided by the 360 Tours.
Key points:
- The HTNW website is being upgraded to a new style and colour scheme.
- The 360 Tours will be refined, to engage casual visitors.
- 360 Video will be presented alongside the 360 tours – for 12 heritage sites.
Here’s a 360 Video created while enjoying some of the countryside around HTNW’s sites:
Drag the view around: you can look in different directions.
Use the play button, on the bottom left to start and pause.
The ‘VR’ button switches to full screen. It’s compatible with Google Cardboard.

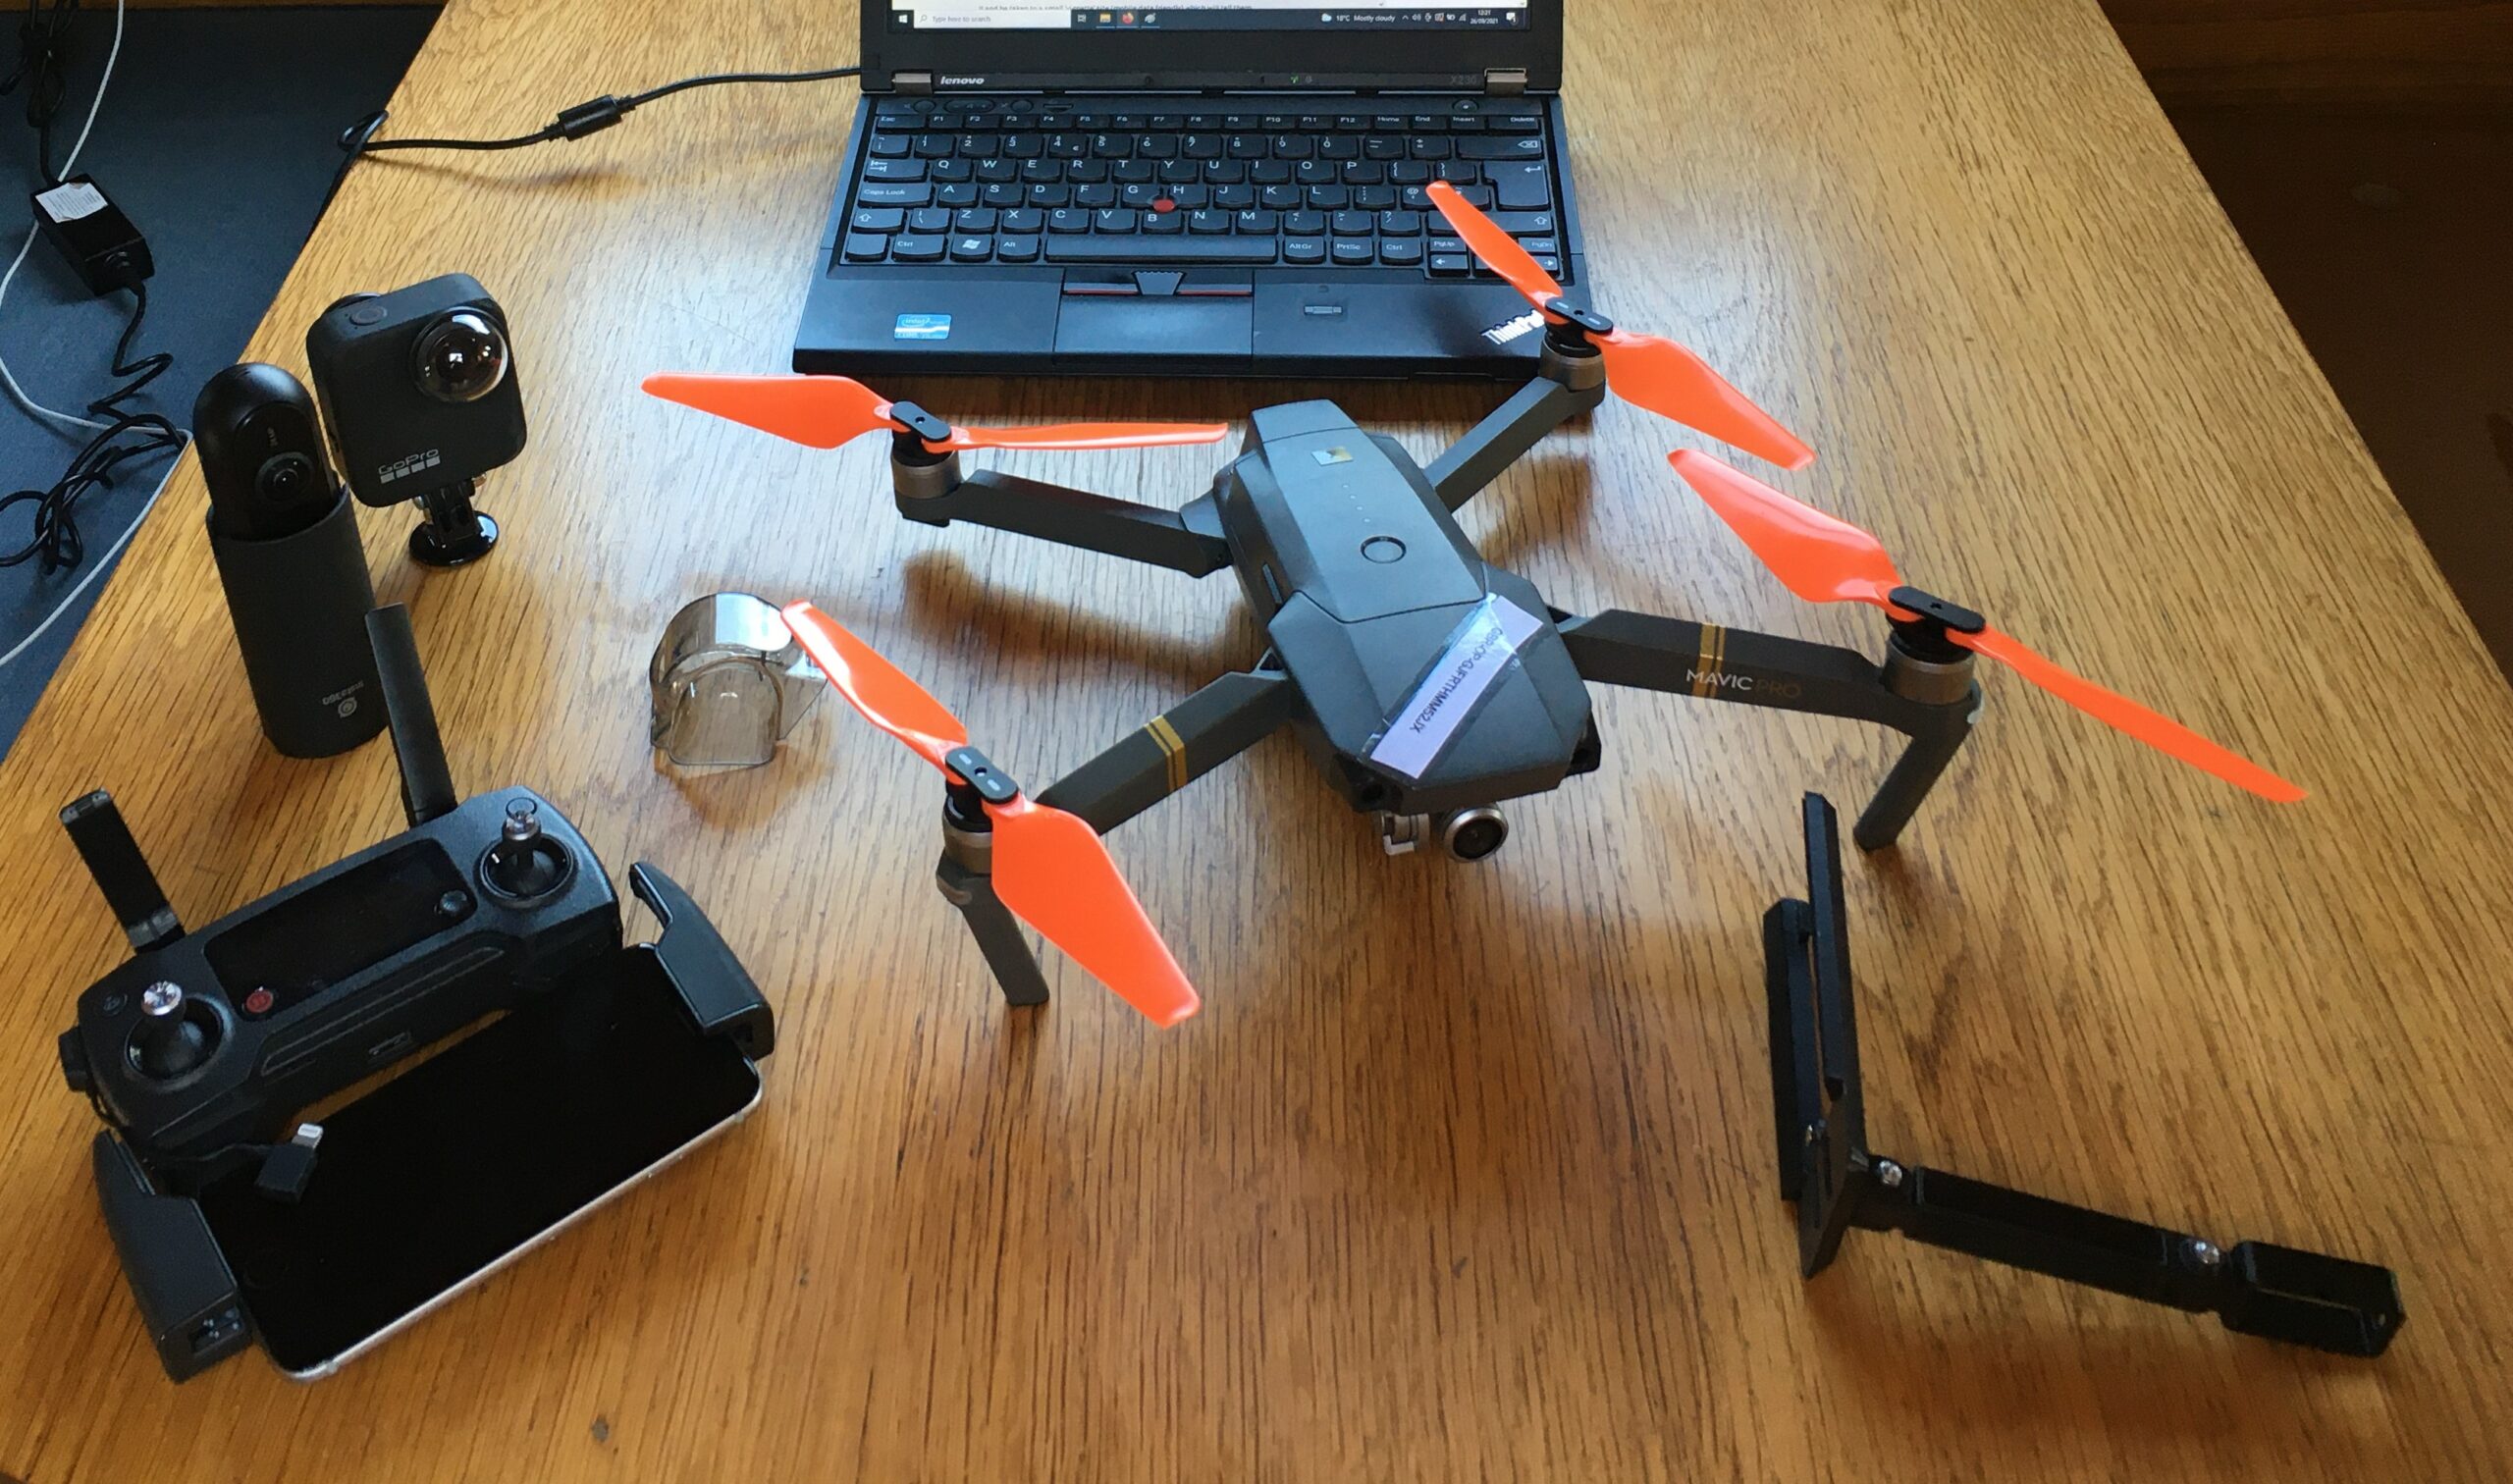
The kit responsible is a refurbished DJI Mavic Pro, with a camera harness – you can see that in the foreground to the right- and the same GoPro Max camera we used for the 360 Tours.

The intention with this part of the project was to provide significant value-for-money. 12 heritage sites, dotted about the northwest would represent a significant outlay if employing a commercial drone specialist. Our intention was to include it within the current work and utilise the skills and equipment already being used. Never having flown a drone before – ‘How hard can it be..?’. The answer is, of course, ‘harder than it looks’. That’s why there are professionals. But if that’s not within the budget – what then?
In this post, we’ll share our experiences of the compromises and efforts needed to get some lovely results on a real budget.
Research being a wonderful thing, we started off by looking at the payload. What can lift a 154g camera..?
There are only a few drone models which are built to carry payloads. Manufacturers actually provide a maximum take-off weight. But we couldn’t afford any of those.
Then we found the Mavic Pro. It belongs to a pro-sumer class of drone, targeting anyone from outdoor pursuits adrenaline junkies to film makers, wanting a rock-steady platform from which to shoot 4K video.
Geeks can spend a while getting lost in the specs, but it has clearly been designed and built with a certain sort of person in mind: one which says ‘drone, film that, until I say stop’.
We were definitely in that category.
Second-hand prices are very reasonable indeed. We picked ours up for £500 from e-bay. It sported a number of other goodies, which were to come in very useful: spare batteries, spare propellers and a swanky man-bag.
How to fly a drone?
Gingerly.
Research, again being a wonderful thing, leads swiftly to the realisation of culpability. It turns out, the authorities (that’s the Civil Aviation Authority, CAA) take a pretty dim view of people flinging these things about, willy-nilly. Here are just a few reasons why:
- Weight of drone and payload: around a kilogram
- Manufacturer’s max altitude of drone and payload: 5000m
- Maximum speed: 40 mph
- Behaviour on fault: drop like a stone
- Battery explosivability on impact: high
- Battery explosion type: flaming molten stuff
- Ancillary damage-causing capabilities: spinning knives (also known as propellers)
This is the reason why pilots of this class of drone are required to register. A small, free, theory test will get you a Flyer Id, and £9 will get you an Operator’s Id, if you’re intending on flying a drone in an organisation. You paste the Operator’s Id onto the drone – sort of like a registration plate – and you’re ready to practice. Well away from anybody. Of course, there are multiple caveats to flying. The object of the theory test is to make you aware of them.
Which is why most mornings at 5am over the months of April, May and June, we were to be found at Turn Moss, Manchester’s likely only place for drone practice. Utilising 45 minutes of battery power over 2 hours was our maximum, before dog-walkers appeared and it was time to vacate.
That’s because drone flights of this class are restricted: no flying within 50m of people, or centres of recreation, industry, or residence. And not above 400ft. And not out of sight. And did we mention airports?
So, not near museums, then?
Ah, you’ve seen the problem.
Unfortunately, although the drone is highly capable, there is always the risk of something going a bit – wrong – and when it does, the CAA like to know you’re going to be OK to handle that. So, no going near museums, until you can prove you can fly like a grown-up. For that you need to qualify for the CAA’s A2 C of C or Certificate of Competence.
There also the matter of insurance. To fly around expensive things like buildings, insurers require an A2 C of C.
Qualifying means 4 logged flying hours, following a fairly in-depth theory course, and an exam. And they want all the clever drone guidance stuff turned off, while you do it. Just you and the joysticks.
The flight course involves practicing several manoeuvres, and then self certifying you can do them. In fact, the drone logs its own telemetry, including speed, altitude and location and you can use this as proof.
It took us around 15 hours of flight time at Turn Moss to feel competent to complete the course.
Once qualified, it was time to practice on some proper buildings, with the 360 camera in place.
The flight training really pays off, here. The dynamics of flying near buildings are very different from flying in an open field. Buildings and wind are very strange partners; it can be very still in a sheltered area and very blustery indeed near corners, archways and the roof.
There’s also depth perception to consider: the drone is very small compared to the size of the building, and it’s almost impossible to gauge how close the drone is from a distance. Observers really help.
The 360 camera introduces problems itself. Hanging underneath the aircraft it affects its centre of gravity and must be clamped in exactly the right position. Too far forward, and the rear motors overheat trying to compensate; too far back, and the camera obscures the fancy altitude sensors. There’s also the pendulum effect, which is why we need to be very careful in gusting wind; too much, and the drone can start over compensating, leading to a swaying motion which can overwhelm the guidance system and bring the whole thing crashing down. There were a lot of dry mouthed moments, while we figured that one out.
Finally, where do you hide, when there is no such thing as ‘behind the camera?’
And while you were practicing, you were planning, right?
Right. We used a number of services and software packages to plan our flying for each site.
- Litchi: drone control and flight planning
- UAV Forecast: drone-specific earth and solar (for GPS) weather
- Air Data – for drone telemetry and diagnostics
- Drone Assist – for air-traffic and restricted area maps
We bought fluorescent tabards and walkie-talkies for up to 3 marshals and pilot, a First aid station and fire extinguishers.
We sorted out a schedule for HTNW to warn site custodians we were coming and arrange dates.
Finally – and this must be the major headache for exclusive drone operators – we crossed our fingers for the weather. No rain, no winds above 15mph.
… and it paid off?
June 2021. Things were just coming out of Covid lock-down. Which was just as well: we were going to need a number of volunteers to act as marshals.
Unfortunately, that wasn’t as straightforward as we’d hoped, and volunteers couldn’t be found for the majority of sites.
Enter Ruth, interpretation specialist, again and her son and buddies. Thanks to them volunteering to wear the tabards, things might have come a bit unstuck. For the remaining sites without marshals, we simply had to make changes.
Simple is better
We went back to our flight plans, found take-off locations with the least chance of encountering people and flew very early – as soon as light was acceptable, keeping the flight’s duration under a minute. This meant a short flight, straight up to around 30m, a pause and then a return. It turned out to be surprisingly effective.
The big question: is it cost effective?
If you have quite a few sites to film, the time and inclination, then the savings are pretty big. Adding drone flights to our 360 tour capability cost us:
- £500 for used equipment
- £180 for a year’s insurance
- £9 Operator registration
- £65 exam (lucky us, the course was free)
- 20 early mornings
It’s also important to factor this into your calculations: in December 2023 all drones of this type will be unsuitable for this work, due to legislation changes. So there’s just time for 2 summers’ projects, and the current crop of second-hand drones will need to be retired for hobby flying, out in the sticks.
The second hand market for the drones which supersede them won’t kick-in until, I guess, 2025, so you’ll need to buy a brand new drone if you want to operate in that time window. Prices for something like the Mavic Pro may go as high as £1200.
Take-aways?
- 360 Drone video is fantastic for showing heritage sites in context and can be integrated into a 360 tour.
- Getting a drone capability is harder than it looks, but not too hard to make it unattractive.
- A2 C of C course and exam is essential
- At least 20 hours’ flight experience needed before a first ‘gig’
- Managing the risk of a drone flight takes the greatest effort
- mind the weather!
This was the last post in the series, looking at how 360 photography can be a cost-effective way of creating engaging content for your heritage site or museum:
Digital for Museums and Heritage 1: 360 Tours
Digital for Museums and Heritage 2: Infotainment